This document is a work in progress!
Prerequisites
-
Ren’Py 8+
-
A code editor (VSCode with the Ren’Py Plugin is recommended)
Walkthrough
1. Project Preparation
-
Create a new project directory under your Ren’Py workspace directory titled "CharacterCreatorTutorial" (or whatever you would like to call it).
-
Download the latest release of the Sprite Customizer (specifically the 'base-project' zip file). and unzip it into your new project directory.
-
In the new project directory, delete the
game/images/ccpdirectory and its contents. -
Create a new directory under
game/imagescalled "sugar". -
Download the tutorial asset pack and unzip it into the
game/images/sugardirectory.-
Your
game/images/sugardirectory should now contain multiple subdirectories named "accessories", "brows", "clothes", etc… -
Explore the directories to familiarize yourself with the assets we will be using in this tutorial.
-
2. The First Steps
2.1 Prep
-
Open up your tutorial project directory in your code editor.
-
Open the
game/sprite_customizer/config.rpyfile. -
Delete all the file’s contents, leaving it empty.
-
Add a new
definestatement for our CustomizedSprite, it’s best to go ahead and make the declaration multi-line as we are going to be adding a lot to it.define player_customizer = CustomizedSprite( )-
Give it a name that we can use in our
showstatements. We are going to name itplayer_basefor reasons we will explore later.define player_customizer = CustomizedSprite( "player_base", )
-
2.2 Adding Our First Layer!
Now we are going to add our first layer to the CustomizedSprite. Layers are declared by creating new SCLayer instances and passing in a set of values that tell it what options it has and how to render them.
Since layers are stacked on top of each other, the first layer is generally going to be the base or skin layer. In our case we have multiple customization options for the skin layer, so this will be one of the more complex examples.
The full snippet is as follows, but we will break down what it means below.
init python:
    def skin_lcb(skin_base, skin_color, **kwargs): (1)
        return Transform(f"images/sugar/skin/{skin_base}.png", matrixcolor=TintMatrix(skin_color))

define player_customizer = CustomizedSprite(
    "player_base",
    SCLayer( (2)
        "skin", (3)
        skin_lcb, (4)
        skin_base=("Skin Base", "Body", [ "dark", "medium", "light" ]), (5)
        skin_color=("Skin Color", "Body", [ (6)
            "#613021",
            "#874c2c",
            "#803716",
            "#b66837",
            "#a96238",
            "#f9bf91",
            "#ecc19f",
            "#9e9a73",
        ])
    )
)| 1 | The skin_lcb Callback is used to generate the Displayable that will be used as
the base layer for our customized sprite. |
| 2 | SCLayer constructor call. |
| 3 | Name of the layer. |
| 4 | Reference to our skin_lcb callback, passing the callback to the new layer. |
| 5 | Skin base option, directly relates to the skin base image files included in the tutorial sprite pack ("dark.png", "medium.png", "light.png"). |
| 6 | Skin color option. A collection of hex codes that will be used to make a TintMatrix to apply the skin color to our grayscale base images. |
The skin_lcb Callback
def skin_lcb(skin_base, skin_color, **kwargs):
    return Transform(f"images/sugar/skin/{skin_base}.png", matrixcolor=TintMatrix(skin_color))
The skin_lcb function is a Layer Callback that is used to build the
Displayable that will be used as the base layer for our
CustomizedSprite instance.
This function takes our two option values ("skin_base" and "skin_color") and uses them to provide a path to the target file and apply a TintMatrix to that target file.
|
The names of a callback’s arguments must be the same as the names of the options
on the relevant layer. Since, in this case, our layer has two options named
|
We pass this function to the created SCLayer instance to tell the layer how to render that part of the customized sprite.
Our First SCLayer
Our first SCLayer instance is constructed with the following arguments:
-
The layer name
-
A callback that will be used to generate our layer image
-
An option group named
skin_base -
An option group named
skin_color
The layer name should be unique across all the layers in a single CustomizedSprite instance.
The callback is described above in The skin_lcb Callback.
The first option group, skin_base, is a list of the distinct portion of the
paths to the target image files. In our case, the paths are all the same except
for the file name (minus the extension) which is one of "dark", "medium", or
"light".
The second option group, skin_color, is a list of hex color codes that will be
used to apply a TintMatrix to the selected grayscale base image.
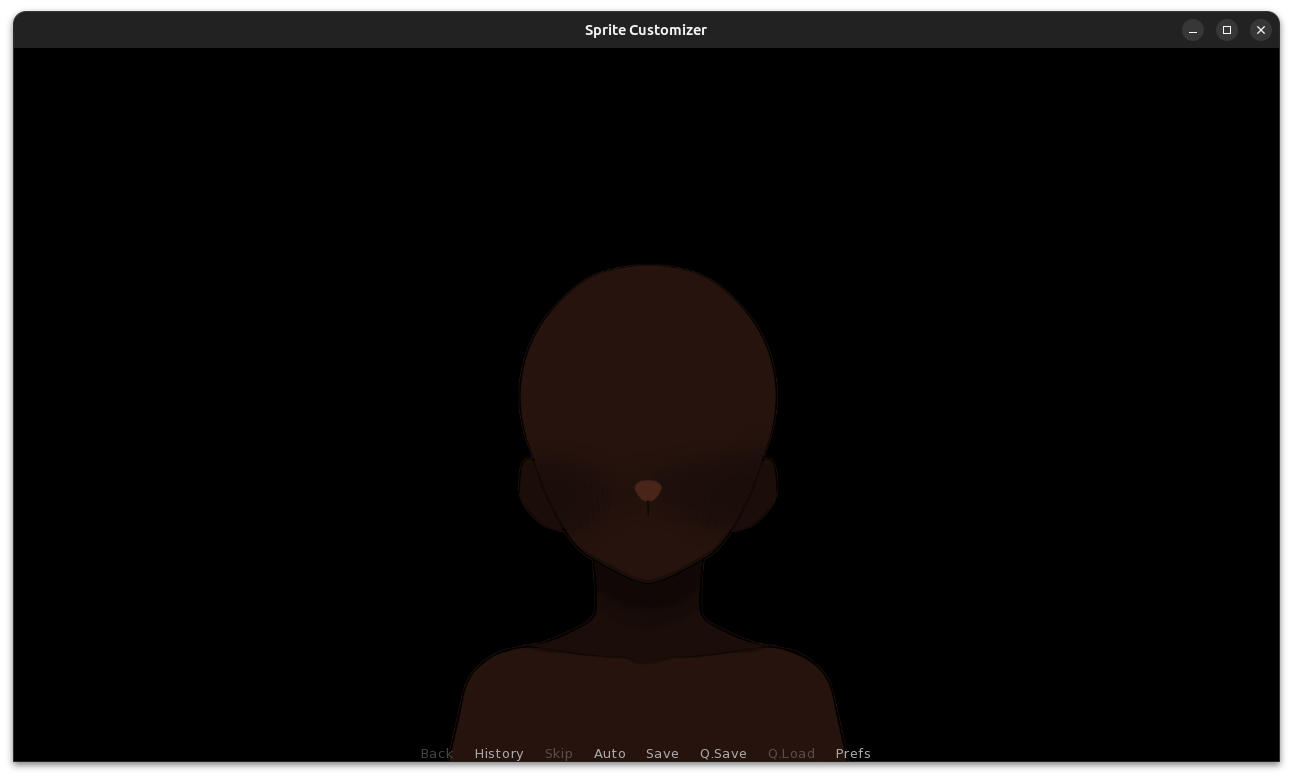
3. Showing Our Image
Now we have a base sprite (even if it’s just a skin layer), lets show it so we can watch our progress in-game via script reloads.
-
Open
game/script.rpyand delete all its contents. -
Create a new [sc-state] object to hold our custom sprite option selections.
default customizer_state = SCState() -
Add an
after_loadlabel and a python line to load our state into the sprite customizer on game load time (without this the option selections will not show when loading a game).label after_load: $ player_customizer.set_state(customizer_state) -
Add our
startlabel and another python line to load our state into the sprite customizer. This is done so that the player’s choices will be stored as part of the game save files.label start: $ player_customizer.set_state(customizer_state) -
Show our customized sprite.
label start: $ player_customizer.set_state(customizer_state) show player_base (1)1 "player_base" is the name we gave our CustomizedSprite instance in config.rpy -
Add a
pauseso the game doesn’t end immediately.label start: $ player_customizer.set_state(customizer_state) show player_base pause 1000000
Now we can reload our game as we add layers and see our changes live!
4. Adding More Layers
Now that we can see what we are doing, let’s go back to config.rpy and add
more layers.
4.1 Clothes
Next we will add the clothes layer, this layer is a simple image swap layer so the definition of it will be more simple than the skin layer.
-
In the CustomizedSprite declaration, add a new argument that is another SCLayer constructor:
define player_customizer = CustomizedSprite( "player_base", SCLayer( ... ), SCLayer( "clothes", "images/sugar/clothes/{clothes}.png", (1) clothes=("Clothes", "Body", [ "tshirt", "tie", "bow" ]) ), )1 For this layer, since we will just be swapping images out without any transforms, we can pass a template path instead of a callback. -
Go ahead and reload the game now and you should see the
tshirtlayer rendering on top of the base image.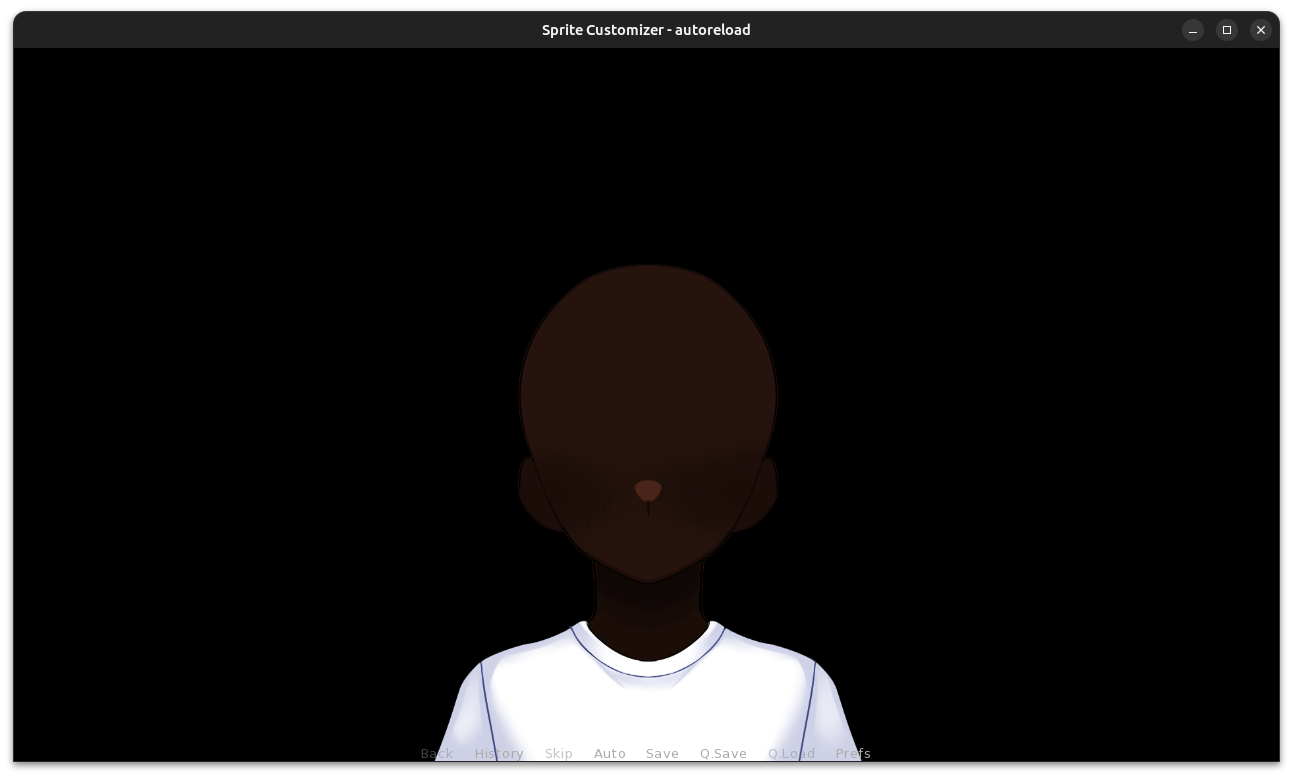
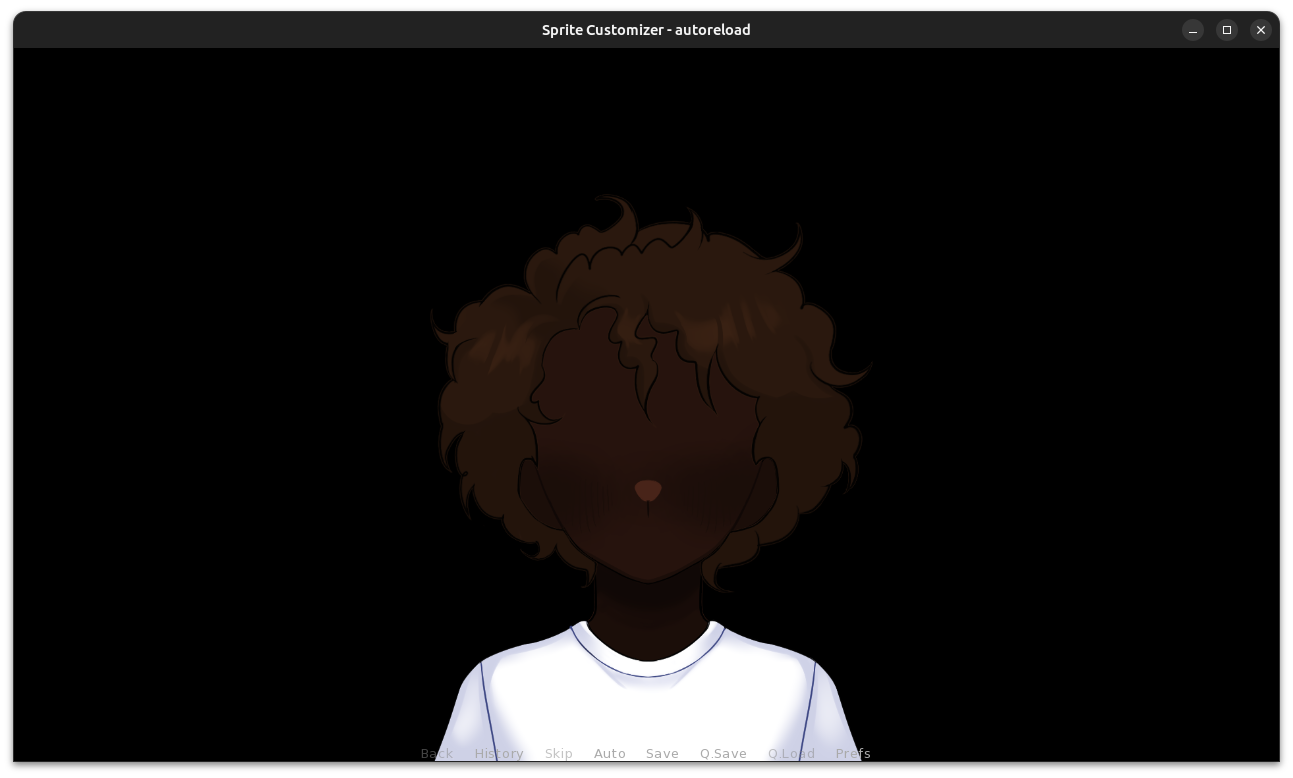
4.2 Hair
Now we will stack the hair layer onto our sprite. This layer is another one with multiple images as well as color options, so we will be declaring another callback.
Under our existing skin_lcb callback in the init python block we will add
a new function named hair_lcb which does the same thing the skin_lcb
function does but with a different image path.
init python:
def skin_lcb(skin_base, skin_color, **kwargs):
return Transform(f"images/sugar/skin/{skin_base}.png", matrixcolor=TintMatrix(skin_color))
def hair_lcb(hair_style, hair_color, **kwargs):
return Transform(f"images/sugar/hair/hair{hair_style}.png", matrixcolor=TintMatrix(hair_color))Lets look at this callback quickly. As it takes the arguments hair_style and
hair_color which means our new layer must have those options attached to it.
Now that that’s out of the way, lets add our hair layer.
define player_customizer = CustomizedSprite(
"player_base",
...
SCLayer(
"hair",
hair_lcb,
hair_style=("Style", "Hair", [ 1, 2, 3 ]), (1)
hair_color=("Color", "Hair", [ (2)
"#3D2314",
"#100C07",
"#DA680F",
"#FFCC47",
"#9A9E9F",
"#FAFAFA",
"#801818",
"#680271",
"#1692CA",
"#11694E",
"#FF87C6"
])
),
)| 1 | The first option just has the values 1, 2, and 3 as that is the only
part of the image name that differs between hair style images. |
| 2 | The second option is a selection of hex codes for hair color options we will allow. |
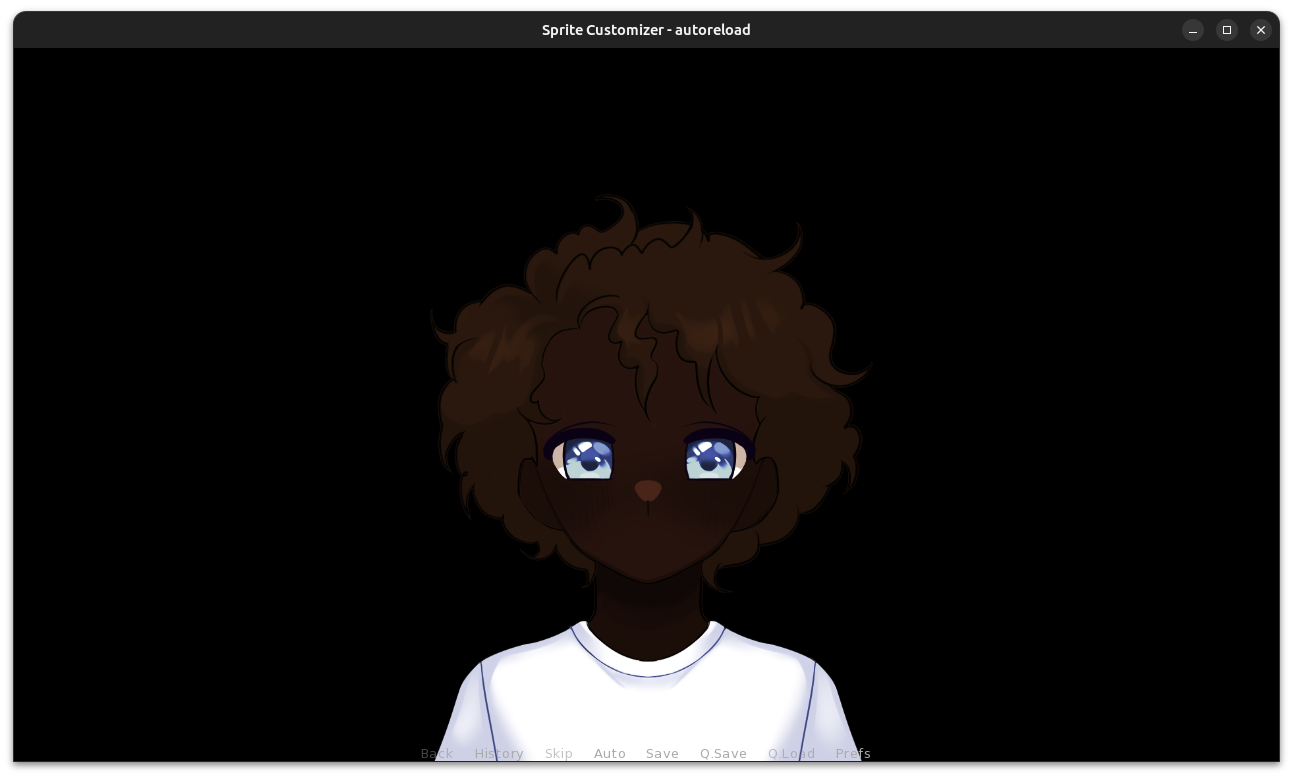
4.3 Eyes
The eyes layer is another simple layer without a transform, so we can construct our SCLayer instance an image path rather than a callback.
define player_customizer = CustomizedSprite(
"player_base",
...
SCLayer(
"eyes",
"images/sugar/eyes/{eye_color}.png",
eye_color=("Eyes", "Face", [ "blue", "green", "grey", "yellow" ])
),
)
4.4 Glasses
Our sprite pack comes with one glasses sprite that we will want to toggle on and
off. For this use case, it doesn’t make much sense to provide a list of options
since there are only two, "glasses.png" and "none.png". To implement this
yes/no choice we can use a new option type SCBooleanOption which is purpose
built for this kind of situation.
This is also a good point to talk about removing options. Right now, there is now way to do this via the Sprite Customizer other than by using a blank PNG file. This is what we will be doing for the glasses and other accessories.
define player_customizer = CustomizedSprite(
"player_base",
...
SCLayer(
"eyes",
"images/sugar/accessories/{face_accessory}.png",
face_accessory=SCBooleanOption(
"face_accessory", (1)
"Glasses", (2)
"Face", (3)
False, (4)
("glasses", "none") (5)
)
)| 1 | For SCOption types like SCBooleanOption, the keyword for the option must
be passed in the constructor. |
| 2 | The display name for the option. |
| 3 | The group name. |
| 4 | The default state for the option, False here equates to "none" in the
option tuple. |
| 5 | The option value tuple, the first value is what will be used when the
boolean value is True, the second value will be used when the boolean value is
False. |
4.6 Bow
In addition to glasses, our sprite pack comes with another accessory; a bow. We will want to be able to both toggle the bow on and off, but also for this example, we want to apply colors to the bow.
Here we will be constructing another layer callback which will take a value from
a standard option as well as an SCBooleanOption.
init python:
...
def hair_accessory_lcb(hair_accessory, hair_accessory_color, **kwargs):
return Transform(f"images/sugar/accessories/{hair_accessory}.png", matrixcolor=TintMatrix(hair_accessory_color))
define player_customizer = CustomizedSprite(
"player_base",
...
SCLayer(
"hair_accessory",
hair_accessory_lcb,
hair_accessory=SCBooleanOption(
"hair_accessory",
"Bow",
"Hair",
False,
("bow", "none")
),
hair_accessory_color=("Bow Color", "Hair", [
"#849FF7",
"#A683F7",
"#FFEB79",
"#FFD679"
])
),
)6. The Character Customization Screen
Now we have added all our base options (the remaining options will be used in
a layeredimage for mood), lets show the included character customization
screen and play with what we’ve made so far.
To do this, go back to the script.rpy file and add call the customization
screen.
script.rpydefault customizer_state = SCState()
label start:
    $ player_customizer.set_state(customizer_state)
    show player_base
    pause 1000000
$ quick_menu = False (1)
call screen sprite_creator("player_base", player_customizer) (2)
$ quick_menu = True (3)
pause 1000000| 1 | Hide the quick menu as it looks out of place with the sprite_creator
screen open. |
| 2 | Call the sprite_creator screen passing in the name of our player image
as well as a reference to the CustomizedSprite instance itself. |
| 3 | Reshow the quick menu when we leave the character customization screen. |
Play around with what you’ve made!
6. Character Expressions
Now that we have a base for character, we can make the Layered Images necesesary to have character expressions. We won’t go into too much detail here as this is a standard Ren’Py feature.
-
Open up the
game/images.rpyfile and delete all of its contents. -
Create a new
layeredimagenamed "player".layeredimage player: -
Add an
alwaysattribute to show our customized sprite,player_base.layeredimage player: always: "player_base" -
Add a new group named "eyebrows" for our eyebrow expression sprites, "angry" "neutral", "questioning", "raised", and "sad" and add those sprite paths.
layeredimage player: always: "player_base" group eyebrows: attribute angry_brows: "images/sugar/brows/angry.png" attribute neutral_brows default: "images/sugar/brows/neutral.png" attribute questioning_brows: "images/sugar/brows/questioning.png" attribute raised_brows: "images/sugar/brows/raised.png" attribute sad_brows: "images/sugar/brows/sad.png" -
Add another group named "mouth" for our mouth expression sprites, "frown", "happy", "smile", and "surprised".
layeredimage player: ... group mouth: attribute frown: "images/sugar/mouth/frown.png" attribute happy: "images/sugar/mouth/happy.png" attribute smile default: "images/sugar/mouth/smile.png" attribute surprised: "images/sugar/mouth/surprised.png"
Now we have constructed a layered image with expressions that we can use as our
character sprite. To do this we need to go back to script.rpy and edit the
references to player_base to say "player" instead. This will use our new
layered image rather than the raw custom sprite it’s based on.
default customizer_state = SCState()
label start:
$ player_customizer.set_state(customizer_state)
show player
pause 1000000
$ quick_menu = False
call screen sprite_creator("player", player_customizer)
$ quick_menu = True
pause 1000000Now we can change our player character sprites expression by using our `layeredimage’s attributes like so:
show player raised_brows surprised
# or
show player angry_brows frown
# etc...Completed Source
game/sprite_customizer/config.rpy
init python:
    def skin_lcb(skin_base, skin_color, **kwargs):
        return Transform(f"images/sugar/skin/{skin_base}.png", matrixcolor=TintMatrix(skin_color))

    def hair_lcb(hair_style, hair_color, **kwargs):
        return Transform(f"images/sugar/hair/hair{hair_style}.png", matrixcolor=TintMatrix(hair_color))
def hair_accessory_lcb(hair_accessory, hair_accessory_color, **kwargs):
return Transform(f"images/sugar/accessories/{hair_accessory}.png", matrixcolor=TintMatrix(hair_accessory_color))
define player_customizer = CustomizedSprite(
"player_base",
SCLayer(
"skin",
skin_lcb,
skin_base=("Skin Base", "Body", [ "dark", "medium", "light" ]),
skin_color=("Skin Color", "Body", [
"#613021",
"#874c2c",
"#803716",
"#b66837",
"#a96238",
"#f9bf91",
"#ecc19f",
"#9e9a73",
])
),
SCLayer(
"clothes",
"images/sugar/clothes/{clothes}.png",
clothes=("Clothes", "Body", [ "tshirt", "tie", "bow" ])
),
SCLayer(
"hair",
hair_lcb,
hair_style=("Style", "Hair", [ 1, 2, 3 ]),
hair_color=("Color", "Hair", [
"#3D2314",
"#100C07",
"#DA680F",
"#FFCC47",
"#9A9E9F",
"#FAFAFA",
"#801818",
"#680271",
"#1692CA",
"#11694E",
"#FF87C6"
])
),
SCLayer(
"eyes",
"images/sugar/eyes/{eye_color}.png",
eye_color=("Eyes", "Face", [ "blue", "green", "grey", "yellow" ])
),
SCLayer(
"eyes",
"images/sugar/accessories/{face_accessory}.png",
face_accessory=("Glasses", "Face", [ "glasses", "none" ])
),
SCLayer(
"hair_accessory",
hair_accessory_lcb,
hair_accessory=("Bow", "Hair", [ "bow", "none" ]),
hair_accessory_color=("Bow Color", "Hair", [
"#849FF7",
"#A683F7",
"#FFEB79",
"#FFD679"
])
),
)game/images.rpy
layeredimage player:
    always:
        "player_base"
group eyebrows:
attribute angry_brows:
"images/sugar/brows/angry.png"
attribute neutral_brows default:
"images/sugar/brows/neutral.png"
attribute questioning_brows:
"images/sugar/brows/questioning.png"
attribute raised_brows:
"images/sugar/brows/raised.png"
attribute sad_brows:
"images/sugar/brows/sad.png"
group mouth:
attribute frown:
"images/sugar/mouth/frown.png"
attribute happy:
"images/sugar/mouth/happy.png"
attribute smile default:
"images/sugar/mouth/smile.png"
attribute surprised:
"images/sugar/mouth/surprised.png"game/script.rpy
default customizer_state = SCState()

label start:
    $ player_customizer.set_state(customizer_state)
    show player
    pause 1000000

    $ quick_menu = False
    call screen sprite_creator("player", player_customizer)
    $ quick_menu = True

pause 1000000Credits
-
Sprite Pack: Sugary Life by Buttery Milk